Thursday, October 24, 2013

A Smiling Jack-O-Lantern Pumpkin


As a child, I always loved to draw a smiling jack-o-lantern face on my pumpkin for Halloween.  I recreated my memories of that pumpkin in this model.  It was created with 11 elliptical shapes with tabs.


 Glue the model into a circle first.


 Please be patient and allow the glue to dry before proceeding to glue each segment together.  When there are three segments left to glue, make the stem and insert it into the middle of the pumpkin.


Continue gluing the elliptical shapes, one at a time and allow the tabs to dry before proceeding to the next tab.


 Glue the circle to the bottom of the pumpkin.


Add the jack-o-lantern face to complete the pumpkin.


You can add a witch's hat and broom to the pumpkin.  I designed them in a previous post http://papercraftetc.blogspot.com/2013/10/halloween-witchs-or-wizards-hats.html
It is the cone net hat and witch's broom that is displayed in the photograph below.


Here is the .Studio file for the jack-o-lantern.  I used cardstock to create the model.

https://drive.google.com/file/d/0B7oGIyVDbRGYMHU4ajliNzcxZzg/view?usp=sharing&resourcekey=0-xzoLTC1VDLUVJ9Oqw1KLnQ

Tuesday, October 22, 2013

Halloween Witch's or Wizard's Hats


I made three versions of witch's/wizard's hat for Halloween.  In designing them,  I kept the values of pi, 3.14 and the golden ratio or phi, 1.618 in mind because these ratios create images that are pleasing to the eye.  Sadly, the Silhouette designer software rounded the 1.618 value to 1.62 so it is not exact.  I created circles that are 3.14 inches in diameter and the hat is 1.62 inches tall.  It is a little longer for the tabs at the bottom of the hat...but it was 1.62 inches...just in case you were wondering and looking at the file.

Pi is for circles.  It is the ratio of the circumference of a circle to its diameter.  Phi is for straight lines. It is the ratio of the line segments that result when a line is divided.  The Egyptians used this golden ratio when designing the Great Pyramid and the Greeks used this ratio when designing the Parthenon.

Here is the .Studio file of the first witch's hat that I created.  I used cardstock.

https://drive.google.com/file/d/0B7oGIyVDbRGYdnI4bjJJTGsteUU/view?usp=sharing&resourcekey=0-bLisoarHTZNYtMwzKkXRdQ

Glue the six triangles together.
 
 Slide into the circle with the star pattern. 

Fold and glue the tabs to the circle.  Glue the circles together.


The next hat is a cone net that I designed.  At first, I thought I would not have to design my own.  There are quite a few already online.  I looked at two and discovered that they were not perfect. I needed to make my own which is not too difficult but time consuming.  I started with a straight line that I copied and rotated with the Silhouette software so that the distance from the apex or top of the cone is consistent throughout the net. It is not as easy as it seems because the bottom curve is not a circle and it needed to be adjusted to be more pleasing the eye.  It looked like a bunch of straight lines that were curved. Yes, circles can be formed this way but a lot more tiny straight lines need to be added to make it perfect.

Here is the .Studio file for the cone net witch's or wizard's hat.  I again used cardstock to cut out this model.

https://drive.google.com/file/d/0B7oGIyVDbRGYdjZGbExSMjJ4Q3M/view?usp=sharing&resourcekey=0-Y-WtkdwssbtL513w4lG1ZA

 
This file contains two versions of brims.  The top brim is for gluing on the outside of the hat.  The bottom brim is for gluing on the inside of the hat.  The choice is yours.  It is easier to glue the brim on the outside of the hat but the tabs show a little too much. You can hide a little of this problem with the hat band. I decided to create the second brim with the tabs on the inside of the hat because it looks better.  There are two versions of the hat design.  One with a hole so that you can hang it as an ornament and the other is without the holes. There are two versions of a buckle for the hat band. I also included some stars and moons if you would like to make it into a wizard's hat.  I would recommend training the cone net into a circle before gluing as it makes it easier to attach together.


 Also I would recommend gluing at the bottom of the cone before closing at the point.  I also pinched the cone together along the seam to help the glue dry.

 You can readjust the curvature once the cone has dried completely.
 
 Left brim glues on the outside, Right brim glues on the inside.


The third version is a sliceform witch's hat.  You slide the corresponding pieces together to form the hat and then glue on the base.


Here is the .Studio file for the sliceform witch's hat. Again I used cardstock for the model.

https://drive.google.com/file/d/0B7oGIyVDbRGYOEM2VGowdmpVWWs/view?usp=sharing&resourcekey=0-uTQCu_m0HWfNgT8xwn6L9A

 Completed models
 
 
Update:  I just made a witch's broom ornament.  Here is the .Studio file.
 
 
Roll the piece with the hole in it so that the hole is on top and glue into a tube for the broom handle.  Roll the fringe around the broom handle and glue.  Add the long strip and attach as shown in the picture below.


Witch's Hat and Broom Ornament

Monday, October 14, 2013

A Honeycomb Pumpkin Decoration for Fall

I made two different versions of this pumpkin.  One for a bulletin board with a flat side and the other as a tabletop decoration.

This weekend we went to see the movie, Captain Phillips.  We walked past a party room at the movie theater and on a table was a tissue paper ball in the center of the table.  The ball reminded me of a torus with its honeycomb structure.  I was always fascinated by the tissue paper decorations with their honeycomb shape.  I remember as a child looking at it and wondering how was it made.  The movie was riveting and Tom Hanks was wonderful as usual.  I would highly recommend going to see the movie.  When I got home, I  wondered if I could create a pumpkin centerpiece using the torus structure and I did it.  Here is the result.


I measured each angle. The first slit is vertical at 90 degrees, the next slit is 25 degrees from the first slit (I used the Silhouette software to create the one slit at this angle and then did a mirror left).  The next two slits are at 24 degrees and 21 degrees, respectively from the previous one. If you overlap both of the torus shapes exactly, you will see that they intersect one another.  This is how they slide into one another to create the honeycomb shape.  The slits are very tight so that the paper will not slide around.  You might have to push a little in order to align the pieces together.

Here is the .Studio file of the torus.  I used cardstock for the pumpkin. The file only contains one of each type of torus slice.  Cut eight of each type to make half of a pumpkin for a bulletin board or 16 of each type to make a desktop pumpkin.

https://drive.google.com/file/d/0B7oGIyVDbRGYc1FreHBFV2tXRDg/view?usp=sharing&resourcekey=0-PykC-4pR_vHjTvbBXA0vcQ

Here is the PDF of the pumpkin.

https://drive.google.com/file/d/0B7oGIyVDbRGYU0hsUG43SExXZk0/view?usp=sharing&resourcekey=0-Tqj9-oNTIFv38bzqh84XAQ


The two long narrow strips are to make a curly vine.  You can wrap the strip around a pencil to create the curly affect.

Here are the directions to put the bulletin board pumpkin together.  Follow these directions for the centerpiece pumpkin...they are the same except for the extra pieces that need to be added.  The key is to start in the center and end in the center for both pumpkins.  When you get to the center of both sides in the centerpiece pumpkin, pick up the stack and connect both ends by sliding in the additional pieces to make it into one continuous round pumpkin.

The two pieces slide together starting with the center piece.
 
 Lay the pieces flat on the table and start adding to the left side. The yellow piece was added.
 
  Repeat until you get to the end.  It should look like this when spread apart.
 
Flip the stack over to the other side. Continue adding the pieces until the end. It should look like this.


 Take the piece with the top slits and connect the like slits in each consecutive piece in the stack until the entire piece is connected.  It will look like this.
 
 
 Next piece to be added.
 
 Keep the stack flat on the table and lift up the next piece.  Always realign the entire stack so that it remains in alignment. After you connect the middle piece and it looks like this.
 
  Turn the stack over and repeat the procedure until you do the middle slit.  Here it is completed.
 
Glue the torus to the pumpkin shape. 


Add the stem by sliding the pieces together as shown below.


The centerpiece pumpkin stem is attached to the middle of the pumpkin with glue.


#sliceform #torus 

Wednesday, October 9, 2013

Pom Pom Chrysanthemum Season

 
Wouldn't it be nice to have some pom pom chrysanthemums?  Yes...they are in season but how would I make one out of paper?  I took down the display of paper sunflowers in the classroom and one of the teachers gave me the idea of making pom pom chrysanthemums.  I took my torus shape and point edited the edges to create the longer flower petals needed for chrysanthemums.  This is not an easy torus to put together...it requires patience.  I recommend doing the easier flower torus from a previous post before working up to this one.

Here is the .Studio file for the chrysanthemum torus. Make one of each file using cardstock.

https://drive.google.com/file/d/0B7oGIyVDbRGYMURwcUliN0Q4ZkU/view?usp=sharing&resourcekey=0-XLCu0HcfeicV2rPdXpZ9rQ

https://drive.google.com/file/d/0B7oGIyVDbRGYVmxZLW5MVGRpdFE/view?usp=sharing&resourcekey=0-Eyp2jx3tgbDk5jM1Eqb7BQ

Here is the .Studio file for the center of the flower.
https://drive.google.com/file/d/0B7oGIyVDbRGYaTBkc01hQV9ka00/view?usp=sharing&resourcekey=0-hIh7LfvTJycr2bkga9sIGw

Here is the .Studio file for the leaves and the stem.
https://drive.google.com/file/d/0B7oGIyVDbRGYWm44bHhfcEVOLVk/view?usp=sharing&resourcekey=0-wzzUETycxYN9EoQhf-b0yg


Here is the PDF of the flower.
https://drive.google.com/file/d/0B7oGIyVDbRGYTnhQQTJTcVJXOFU/view?usp=sharing&resourcekey=0-oAeUBWc6bip4QdMIR_QicA

 
 The torus without any embellishments.

I used plastic drinking straws for the stem.  I put two straws together by sliding one straw into the other.  I wrapped it with green cardstock.  I used the shear feature in Silhouette Studio for the first time.  This parallelogram piece of paper has a 30 degree horizontal shear so that it wraps nicely around the straw. Train the paper to roll around the straw before gluing...it makes it easier to handle.

 Glue the green cardstock to the straw and also attach the leaves with glue.

 
 Make the center of the flowers by gluing the stack of embellished circles in ascending order.  Add a contrasting circle to the center. Make two...one for each side of the flower.


 Make a slit in the straw as shown.


The large circle will be attached to the slit in the straw but don't glue it until you insert the straw into the center of the flower as shown below.


 Straw is going through the middle of the flower.
 
 
 Glue the circle and attach one of the centers.  Repeat this step for the other side. Please be patient.  Let the glue dry for awhile before moving the flower to ensure that both sides of the middle of the flower remain attached to one another.


 Finished flower before the bottom of the stem was cut off.


I put one of the Pom Pom Chrysanthemums in a flower pot with some oasis as support. I am going to keep one of the flowers at home and I will bring the other one to school.
Marley always want to get into the picture.
 
 I painted Vincent Van Gogh's Vase with Fifteen Sunflowers last year.  I think my torus mimics one of the flowers in the painting.
 
Update...I added a wooden skewer to the center of the straw.  The flower was starting to bend because of the weight of the flower.

#sliceform #torus

Sunday, October 6, 2013

Halloween Spiders

After creating the sliceform pumpkins, it dawned on me that the interior cuttings of the circle sliceform looked like a spider.  However, the cuttings only had six legs and spiders have eight legs.  No problem, using math, I created an eight-legged spider.  Each of the legs is at a 45 degree angle.  I found some random beads in my craft closet...one of the beads is from a broken necklace and the other beads are seed beads and glued them to the center of the spider.


Here is the .Studio file for the spiders.  There are twelve on one page.  I used cardstock.

https://drive.google.com/file/d/0B7oGIyVDbRGYV2ZScHpNWW1haUE/view?usp=sharing&resourcekey=0-0VIkmAp0WhuZbV5afAxjMg

Here is the PDF of the spiders.
https://drive.google.com/file/d/0B7oGIyVDbRGYQmhIU0pFdWk4cmM/view?usp=sharing&resourcekey=0-OxPn6iNfHoSO7AOsaP1M2w

I love my spiders! They look so real that they fooled my cats.  Be careful if you have a cat, they might want to steal it away and play with it.


Sliceform Pumpkin and Apple

Using the images that I created in a previous post of a pumpkin and apple, I created a sliceform version.  I made a circle with a six pointed slit in the middle (60 degree angles were used to create this).  This circle slides down the center of the pumpkin/apple to create this sliceform.  They both have three horizontal slices.


The pumpkin version has the largest circle in the middle.


The apple version has the smallest circle at the bottom and the largest circle on top.

Here is the .Studio file for making one pumpkin.  I used cardstock and I have included a leaf and a curly vine to make. To make a curly vine, twirl the paper around a pencil.

https://drive.google.com/file/d/0B7oGIyVDbRGYNlZtM2oySjlTSlk/view?usp=sharing&resourcekey=0-04HREyEotQBm2hpbgemn2w

Here is the .Studio file for making one apple.  I used cardstock and I have included a leaf for the apple.

https://drive.google.com/file/d/0B7oGIyVDbRGYMXMtZHlWQUFtb0k/view?usp=sharing&resourcekey=0-3xYbpnoSSFex6Pvi1A2l6Q

Here is the SVG.

Saturday, October 5, 2013

Can You Name the Three Ships That Sailed with Columbus?

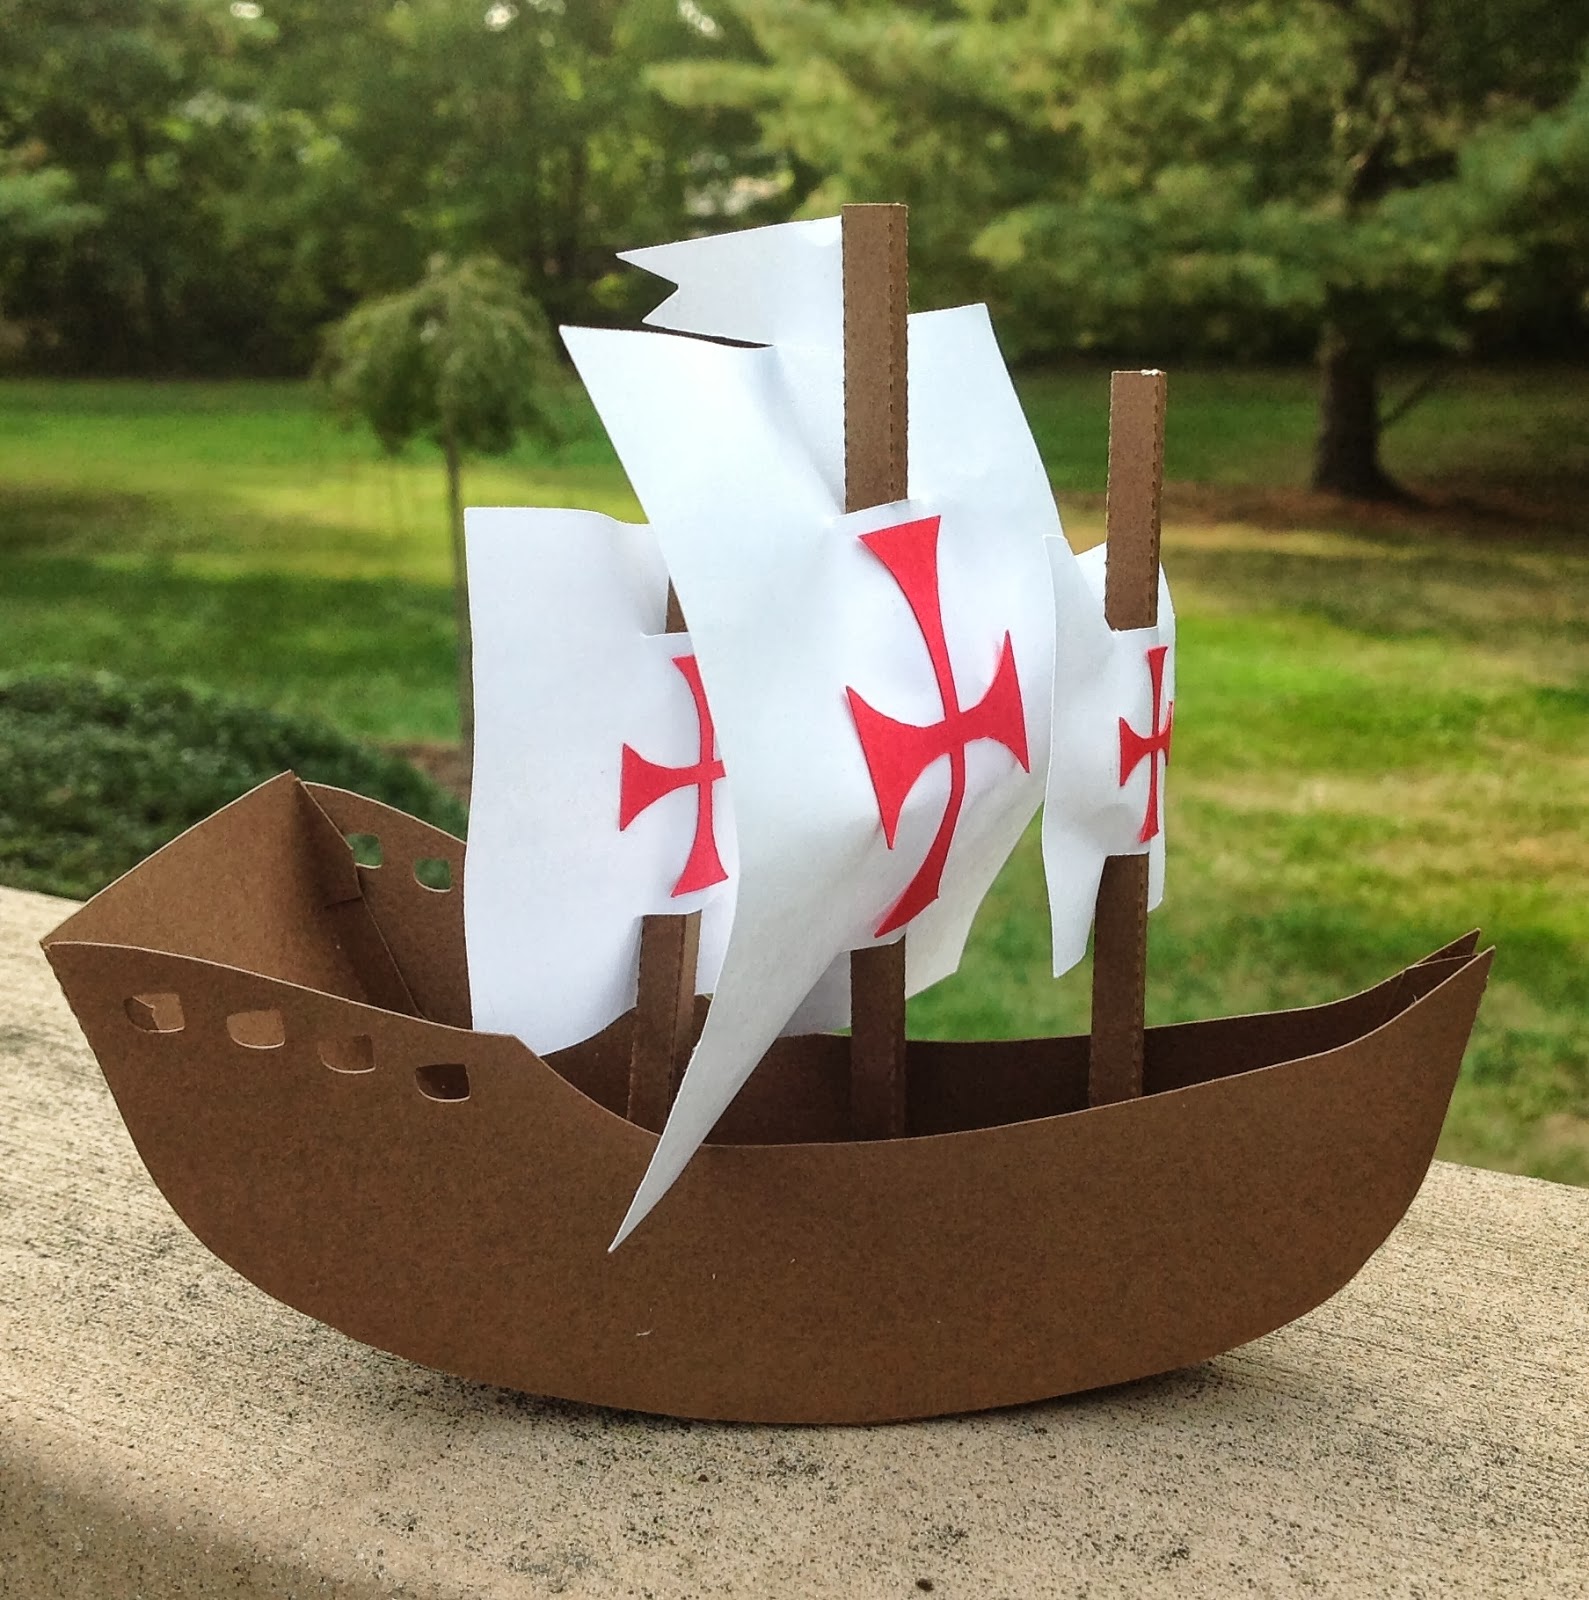
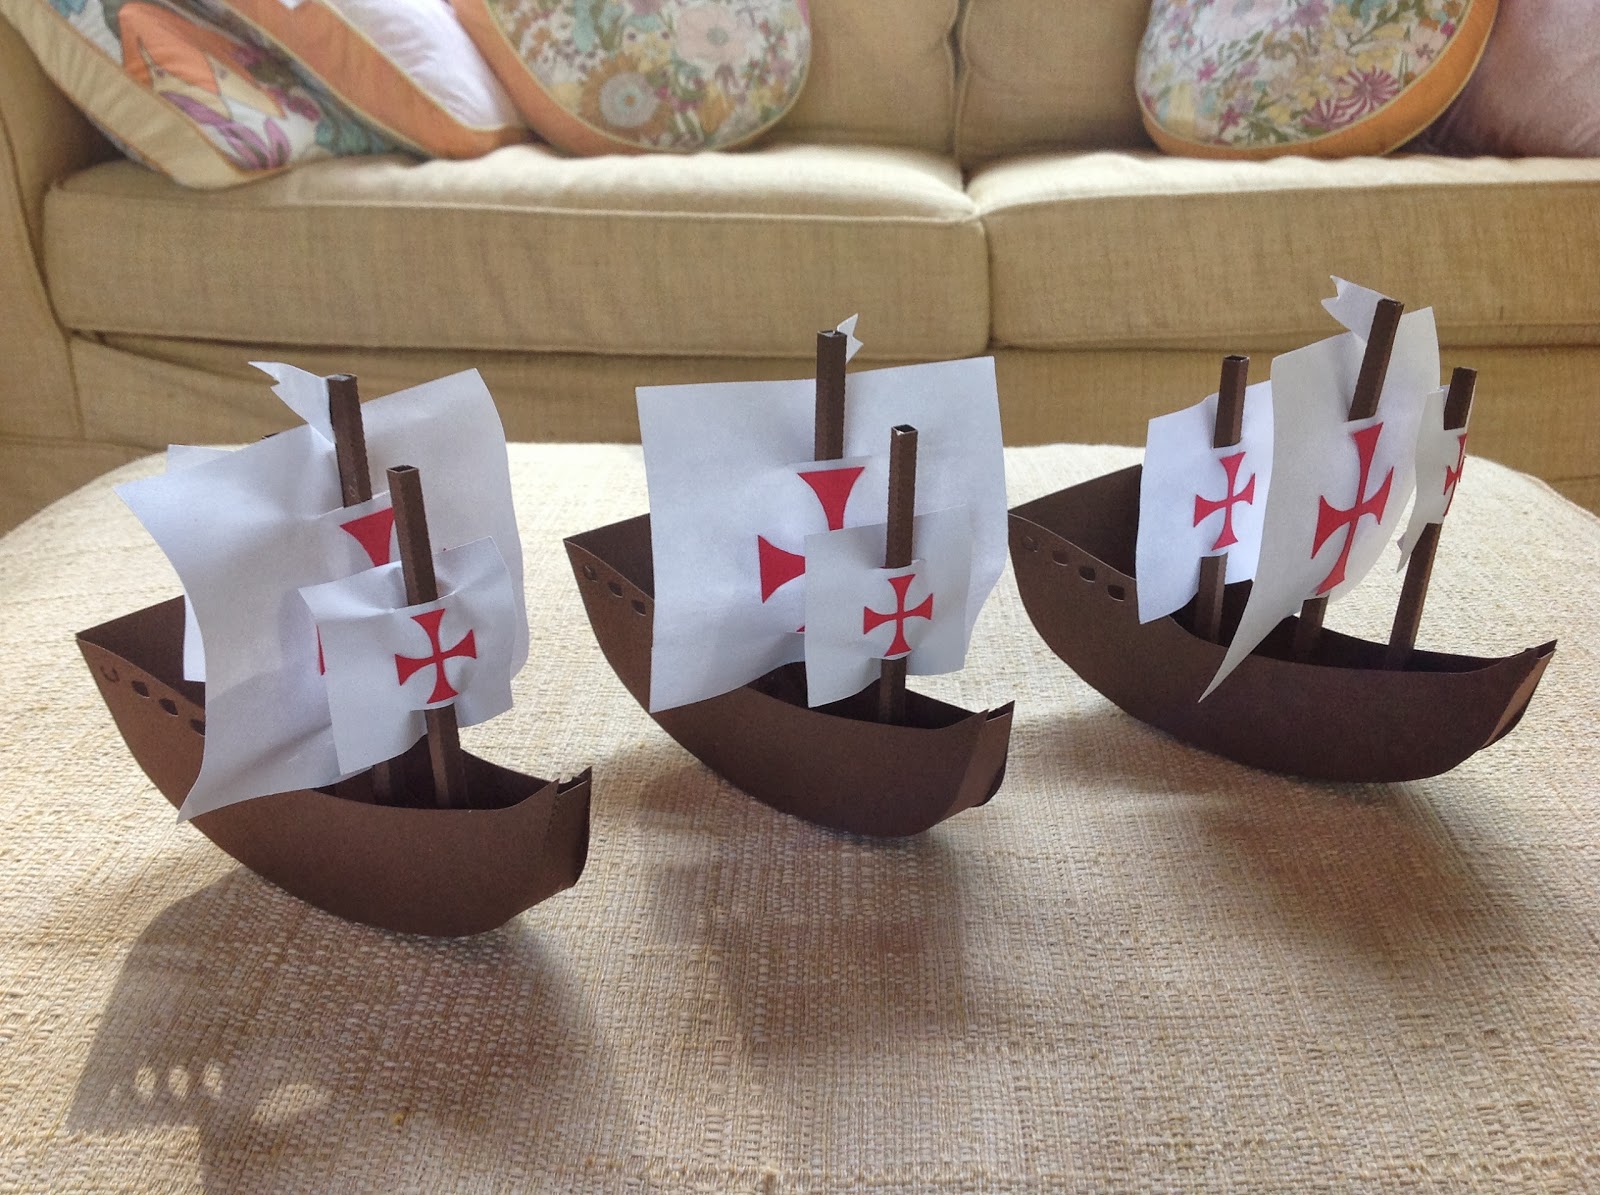
In 1492, Columbus sailed the ocean blue...on the Nina, the Pinta and the Santa Maria. So why do I ask, because I am going to give you a .Studio file of these ships.


My husband woke me up at 4:45 the other morning because he wanted to study for his Mathematics for Economics course at Johns Hopkins. I could not go back to sleep so I decided to make a ship for Columbus Day before I went to work.

Here is the .Studio file for the ship. I used cardstock
https://drive.google.com/file/d/0B7oGIyVDbRGYSExJcUR1VHhVWFU/view?usp=sharing&resourcekey=0-UYoxFIhStsgEKggbB4HdSw

Here is the .Studio file for the masts. I used regular white copy paper for the sails and red cardstock for the cross.

https://drive.google.com/file/d/0B7oGIyVDbRGYOExyaGNXNGpuWGs/view?usp=sharing&resourcekey=0-Lwu9Zq_Hz7KI7qCoJeCQFg


Glue the flag on the main mast...longest one and apply glue as shown above.  Make it into a square tube.  Glue the red cross on the white sail.  Attach as shown below. Repeat for the other two poles.


Curve the body of the ship as below before gluing on the side of the ship.


Glue on the sides starting at the back of the ship for alignment.  Attach the masts by putting the tabs into the slots and glue underneath the ship as shown below. Yes...it is a little messy but no one will see it. Repeat for all masts.


 All ready for Columbus Day!


PDF files of ship and masts

https://drive.google.com/file/d/0B7oGIyVDbRGYZkVKcm56dnNIZFU/view?usp=sharing&resourcekey=0-hlxV_N6nwinHK-yEoAAhRQ

https://drive.google.com/file/d/0B7oGIyVDbRGYRVNidjloRlhNa00/view?usp=sharing&resourcekey=0-REWneqV74ARuhl_tz-m6DA

Here is the complete 1492 poem just in case you were trying to remember it...

IN 1492

In fourteen hundred ninety-two
Columbus sailed the ocean blue.

He had three ships and left from Spain;
He sailed through sunshine, wind and rain.

He sailed by night; he sailed by day;
He used the stars to find his way.

A compass also helped him know
How to find the way to go.

Ninety sailors were on board;
Some men worked while others snored.

Then the workers went to sleep;
And others watched the ocean deep.

Day after day they looked for land;
They dreamed of trees and rocks and sand.

October 12 their dream came true,
 You never saw a happier crew!

“Indians! Indians!” Columbus cried;
His heart was filled with joyful pride.

But “India” the land was not;
It was the Bahamas, and it was hot.

The Arakawa natives were very nice;
They gave the sailors food and spice.

Columbus sailed on to find some gold
To bring back home, as he’d been told.

He made the trip again and again,
Trading gold to bring to Spain.

The first American? No, not quite.
But Columbus was brave, and he was bright.