Monday, September 30, 2013

Dreaming of Santorini...A Windmill House

Santorini is a beautiful Greek island with white-washed houses with blue roofs. My husband and I went there a few years ago.  I would love to return.  In the meantime, I decided to recreate my memories by designing a windmill.  This is my version without the wooden crossbeams because it would require more engineering that I am willing to do on this project.  I would have to worry about the weight of the wooden crossbeams and how to attach it...so not today.


Here is the .Studio file for the Santorini windmill. I used cardstock to create the model. Bend the paper model into a cylinder before gluing. Fold up the circle tabs on the bottom and glue to the windmill forming a cylinder. Glue the side. Fold down the circle tabs at the top and glue to the windmill. Bend the cone into its shape before gluing. 

https://drive.google.com/file/d/0B7oGIyVDbRGYX2stTlY3TDRnR0E/view?usp=sharing&resourcekey=0-YuNfZ4T7NDU_aSqPPXyyWA

Here is a picture with my previously designed house so that you can see the windmill in reference to size.


Sunday, September 29, 2013

Fall is in the Air and It's Pumpkins, Apples and Football Season

The leaves are starting to change color and I wanted to add some fall color to my house.  I decided to create paper pumpkins, apples and a football with my Cameo Silhouette.


Here are the .Studio file for the pumpkins.  I used cardstock but you could use regular scrapbooking paper for both the pumpkins and apples. 

https://drive.google.com/file/d/0B7oGIyVDbRGYMm9QSXA1dVJaaUk/view?usp=sharing&resourcekey=0-gqMfog6JKVHziP-rdM8WXA

There are twelve images to an 8 1/2 x 11 page.  I used 6 images to create my pumpkin.  You could use more if you would like.  Fold them in half and apply glue to one side of each pumpkin as shown in the picture below and attach in a circle.


Here are the .Studio file for the apples.

https://drive.google.com/file/d/0B7oGIyVDbRGYU21WbFlCTWxJdFE/view?usp=sharing&resourcekey=0-mmcv05ZlfkvQh4g9v90N1w

Again there are twelve images to an 8 1/2 x 11 page.  I used 6 images to create the apple.  You can use more images if you would like.  Assembly is the same as the pumpkins.  Fold in half and apply glue to one side of each apple and attach in a circle.

Here is the .Studio file for the leaves for both the apple and the pumpkin. There is also a twirly vine for the pumpkin. Curl the four narrow strips of paper like curling ribbon to create the vine.

https://drive.google.com/file/d/0B7oGIyVDbRGYQ2c1OXVhSDNxQ00/view?usp=sharing&resourcekey=0-Rvdm2eWlXRDmygJkIYxWEg

Here is the .Studio file for the football.  I used cardstock for a sturdy football that can actually be thrown.  My husband threw a spiral with it.

https://drive.google.com/file/d/0B7oGIyVDbRGYTkhoak9CcnQySU0/view?usp=sharing&resourcekey=0-mOMKnspHq0XQeUuv4khbHg

The football is a little difficult to put together.  I recommend gluing one side at a time and letting it dry before proceeding.  Otherwise, you will get frustrated.  I cut the laces on the same brown cardstock as the football.  I painted the laces with white acrylic paint.  If you don't have paint you could cut it on white paper but I thought it would be more fun to paint it.


Marley loves to be part of my paper projects.
 

Friday, September 27, 2013

Six Square Pyramids Can Fit Perfectly Into a Cube

Six Square Pyramids Can Fit Perfectly Into a Cube


A few years ago, I visited the Great Pyramid of Giza in Egypt with my family.  It is one of the seven wonders of the ancient world that is still in existence.  It's a remarkable sight to see and a wonder as to how it was built with such precision. One of the many amazing facts about the pyramid is that if you take the perimeter of the pyramid and divide it by twice the height, you get a number that is exactly equivalent to the number pi up to the fifteenth digit - 3.14159265358979. The perimeter of the Great Pyramid of Giza that I found online is 921.25 meters and its original height being 146.64 meters which calculates to 3.1412 (However, I can't find the exact measurements online so I can't verify the above fifteen digit calculation...if you find them please email me).  Here's a funny way to remember pi up to the fifteenth digit. Count the letters in the words of the following mnemonic:

How I need a drink, alcoholic of course, after the heavy lectures involving quantum mechanics.

The Great Pyramid of Giza measurements are 51° 51’ 14" for its base and 76° 17’ 32" for the vertex...I am noting these measurements for reference. In making this square pyramid with a cube, I used 54° for its base.

Here is the PDF of the square pyramid and box.


Here is the .Studio file for the square pyramid that I created. Cut six pyramids and one cube using cardstock.


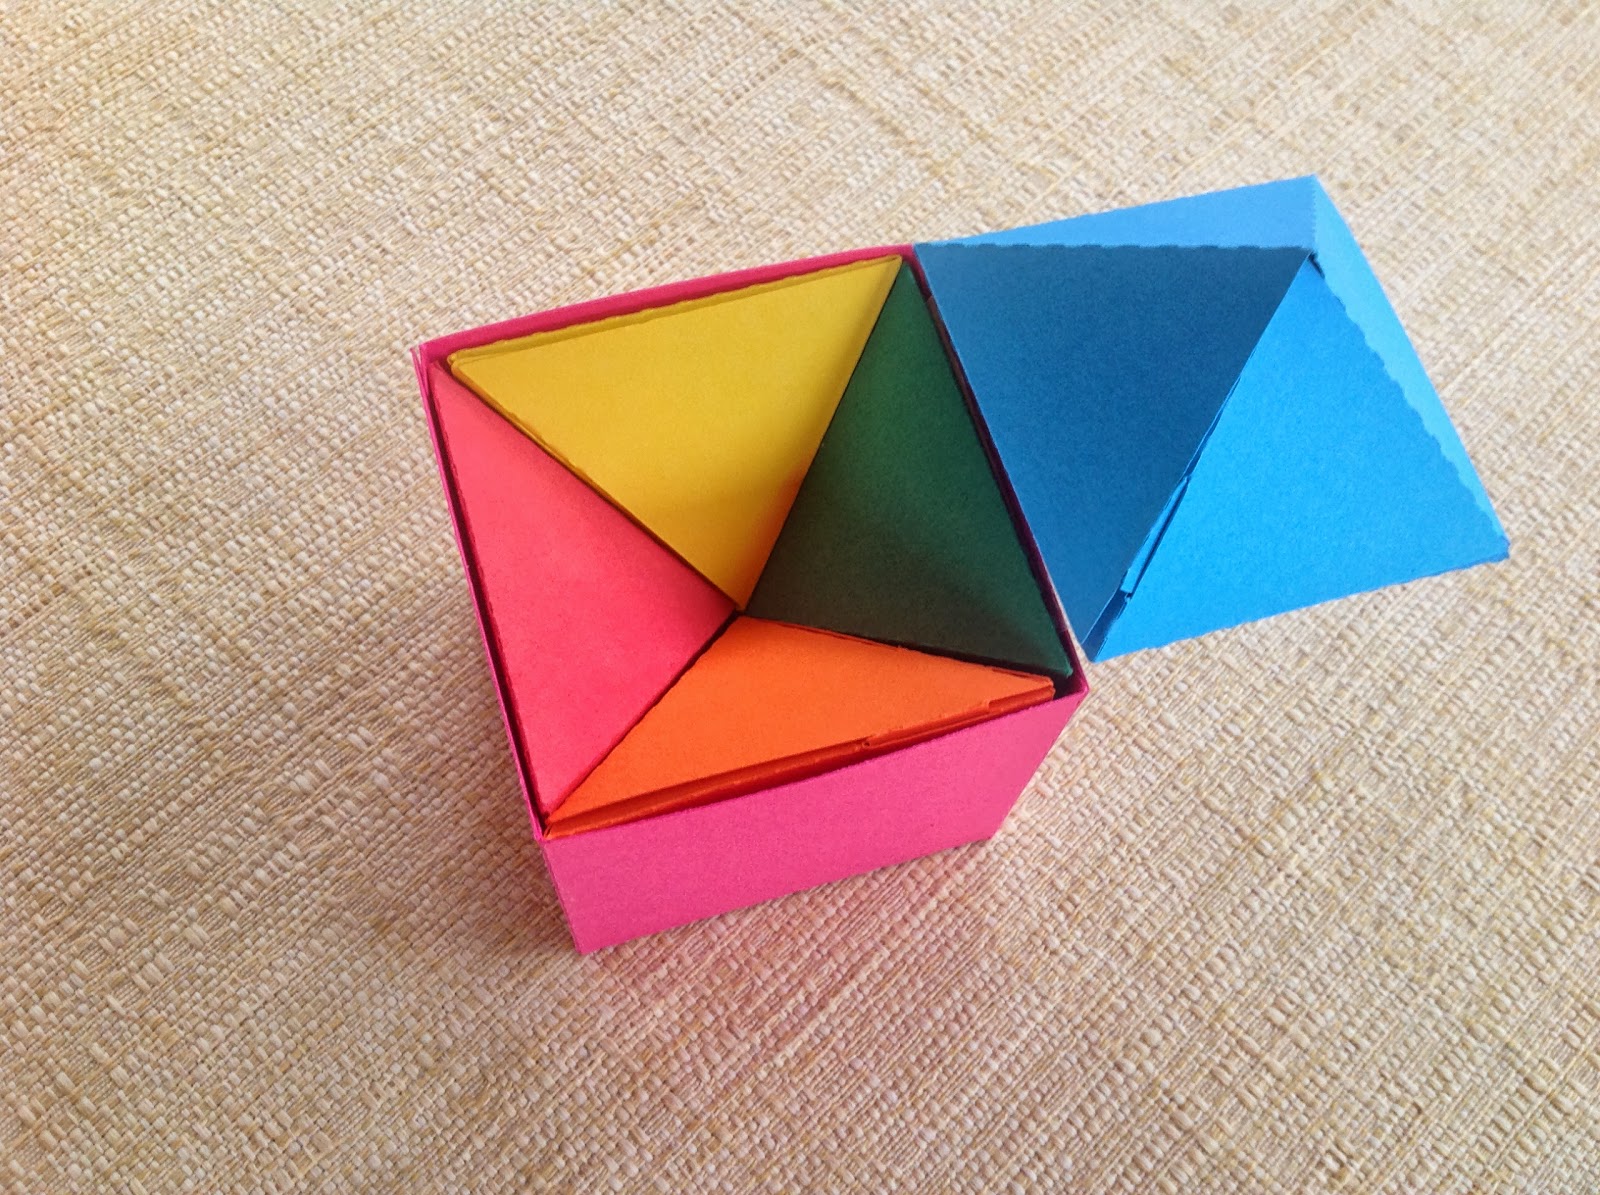
The square pyramids that I created for the Cameo Silhouette have two tabs.  They do not need any glue.   Repeat this until six square pyramids are created. Tape the pyramids together as shown below. 


 Tape the underside of the square pyramid using five strips of clear packing tape to form a figure as shown.


Next, fold the square pyramids together to form a cube. Below is the finished product with one pyramid left to be placed in cube.


This activity demonstrates volume.  Parts of a whole are added together to calculate the total volume of the cube. Remember that the volume of the pyramid is (base x height)/3. After calculating the volume of one square pyramid, you would need to multiply by 6 to determine the total volume of this cube since 6 square pyramids make up this cube.

Sunday, September 22, 2013

The Leaves Are Starting to Fall and It is Time for a Math Bulletin Board

I created a fall themed bulletin board for my math class.  I bought the bear in the wagon and the crows in the basket from the Silhouette online store.  I increased the size of the images by 200 percent. The tree was made from Kraft paper strips which were crumpled.  I copied the leaves from the internet and resized worksheet word problems to fit within each leaf.   The students answered the word problem, cut out the leaf and stapled the leaf to the bulletin board.  The student's reaction to the leaf problems were very positive. They love to see their work and by having them staple it to the board...they felt proud of their accomplishment.  They showed their work to others when they walked by the bulletin board. In fact, they asked to do them again for other occasions. Here are a few of their suggestions...Thanksgiving turkeys, snowflakes, snow men.

The bulletin board was up a few days when I saw an upper level math student stop and look at a math problem and try to figure out an answer.  Wow...that's a good math bulletin board...what an impact.


I Now Love Making Paper Houses

Paper House with Sliceform Trees

I love making all kinds of houses.  First gingerbread houses...I have made more than a hundred gingerbread houses over the course of many holidays. I even made them for a bridal shower.

Katie's friend - Lisa's shower party

Then doll houses...


Now, I decided I need to make the houses in paper.  This model is four inches tall.


Here is my version as a .Studio file.  I used cardstock to cut out the house.

https://drive.google.com/file/d/0B7oGIyVDbRGYUHAydDhycHB2WDA/view?usp=sharing&resourcekey=0-W2-A4scPXwi8huR-ayYc5A

I hope you like it.  I have many more ideas for these houses.  Hopefully, in the near future I will be able to add more paper models to my vision.

The sliceform tree directions are in another post.
http://papercraftetc.blogspot.com/2013/11/how-can-you-make-cone-with-analytical.html

A Circle Within a Circle Slice Form

A circle within a circle sliceform. I created this slice form with geometry.  I made a circle and divided it equally into parts.  Each slit represents a 45 degree angle.  The slits are at 0, 45, 90, 135, 180, 225, 270 and 315 degrees. The corresponding circle is similar at the equator.  However, the two outermost corresponding circles needed to be skewed because the width of the ring that is being intersected is different than at the equator. I had to measure this with a ruler to adjust both outermost circle sizes.  I am sure there is a mathematically equation that I could have used but it was easier just to measure the distance and adjust the size in the Silhouette Cameo designer software.


Notice the 45 degree angles
The circle in the middle(light purple) is similar to the corresponding circles (dark purple).

The two outermost circles(light purple) had to measured with a ruler.


Here are the .Studio files. Cut one of each file in cardstock.

https://drive.google.com/file/d/0B7oGIyVDbRGYcmw3cHQ2MHpIaDA/view?usp=sharing&resourcekey=0-Lkf_ZgOecV9KnWePHKSIgQ

https://drive.google.com/file/d/0B7oGIyVDbRGYWXVRelFyLVA3TlU/view?usp=sharing&resourcekey=0-MGZTFIbYAYbQPIk5rv-9hw

Here is the PDF.

https://drive.google.com/file/d/0B7oGIyVDbRGYSEVqSjRFNkt6WFU/view?usp=sharing&resourcekey=0-JE1T4OCWdUWq4508vktqfQ

#sliceform #circle #globe #sphere

A Cube Within a Cube Slice Form

This summer I explored origami and I was fascinated when I folded a cube within a cube.  I tried to replicate this idea using a slice form.  I cut some squares and tried various methods.  I came up with the following slice form.  It was a little difficult to slide together because the paper must be bent this way and that way.  This model can be folded flat.  This is a very important phenomenon because it has applications in space exploration.  For instance this could be a solar array panel which would lay flat in transport and be deployed to open in outer space.


Here is the .Studio file if you care to explore this slice form. Cut one using cardstock.
https://drive.google.com/file/d/0B7oGIyVDbRGYcU5FTGVaQkNFN28/view?usp=sharing&resourcekey=0-O_AicunP4cK_N2IDy6H6Hg

Here is the PDF.
https://drive.google.com/file/d/0B7oGIyVDbRGYTU9WV0RDbTE0VEU/view?usp=sharing&resourcekey=0-4NiQWJNKb4mnTJTq1DFMcA

#sliceform #cube